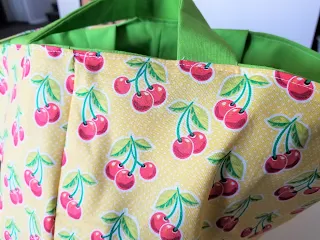
They were everywhere. Toys, books, and clothes.
We needed some help getting organized and my first thought was to turn to my sewing machine.
Why not put together a fabric basket tutorial that I could use in my house and share with my readers.
This post contains affiliate links to products I recommend. I do make a portion off any you may purchase. See full disclosure here.
One thing I love about sewing is that I can inexpensively get organized with projects like this.
Plus, I love going through my fabric stash and creating one of a kind home decor that matches each room.
This fabric basket is great because not only is a nice size, but it has handles on the side. Which makes toting it around the house easy.
Much like our simple fabric bucket, this pattern is also reversible. So if you need a change, you can flip it inside out and have a different look.
Let me share with you how to make an easy fabric basket.
How to make a fabric basket
Materials Need:
- ½ yard of cotton fabric
- other fabric options include cotton blends, flannel,linen, quilting cottons
- ½ yard of contrasting fabrics
- Mediumweight Iron on Interfacing
- Thread
Step 1
For the basket, cut 2 15” x 20” pieces in main fabric,
lining fabric and interfacing.
For the straps, cut 2 15” x 4” pieces in main fabric and
interfacing.
Step 2
Press the interfacing to the wrong side of the lining
pieces.
Step 3
With Right Sides Together (RST), match the two lining
pieces. Stitch around 3 sides of the
bin.
Step 4
Open up the bin and create a sharp tip in the corner of the
bin lining. Measure in 4” and draw a
line.
Stitch across this line.
Repeat with opposite corner.
Repeat steps 1 and 2 with the main fabric pieces.
Step 5
Press interfacing to the wrong side of the straps.
Fold the strap in half with right sides together and match
the raw edges. Stitch across the long
edge of the strap.
Step 7
Turn the strap right side out and press.
Repeat with opposite strap.
Step 8
Pin the strap to the right side of the main fabric
piece. Space the strap evenly on either
side of the side seam.
Repeat with opposite side and other strap.
Step 9
With RST , place the lining bin into the main fabric
bin. Pin them together around the top.
Make sure the straps are tucked inside. And mark a 3-4” opening that you won’t sew
closed.
Stitch the two bin layers together around the top raw edge.
Step 10
Turn the bin right side out through the opening. Press.
Topstitch around the top of the bin.
Wasn't that super easy?!
Now you can make loads of DIY fabric baskets to hold toys, books and games.
Like getting organized? Check out these other great sewing projects for the home.


what is the finished size please?
ReplyDeleteand how many 20x15 do you cut, is it 6 in total
ReplyDeleteStep 1
DeleteFor the basket, cut (2) 15” x 20” pieces in main fabric, lining fabric and interfacing. - six pieces total in 3 materials
For the straps, cut (2) 15” x 4” pieces in main fabric and interfacing. - 4 pieces total in 2 materials
I'm a little confused. Do you only need interfacing for the lining fabric? After attaching the interfacing to the lining, sewing the 3 edges, and creating the corners, the instructions then say "repeat steps 1 and 2". Step1 is cutting out the fabric and Step 2 is attaching the interfacing to the lining. Should it actually say "repeat steps 3 and 4"? Or should I be cutting out and attaching interfacing to the main fabric as well?
ReplyDeleteThe instructions are correct. You want interfacing on the lining and main fabric. This bin sits upright and the extra interfacing gives it more strength. Hope that helps.
Delete