A trend that has been on the rise the past few years is making beeswax wraps. This is a trend that I can totally get on board with.
Not just because they are sustainable, but they are also much better than using a cling wrap.
Several years ago I made these great reusable snack bags. They were a huge hit with my kids and made packing lunches and picnics easier for me.
Naturally, I thought learning how to make beeswax wraps was a great idea.
I've talked to several people about using beeswax to make reusable food wraps. Some people have concerns and other people think it is a great idea and are totally on board.
I hope to answer some of the questions you might have about using reusable sandwich wraps.
Not just because they are sustainable, but they are also much better than using a cling wrap.
This post contains affiliate links to products I recommend. I do make a portion off any you may purchase. See full disclosure here.
Several years ago I made these great reusable snack bags. They were a huge hit with my kids and made packing lunches and picnics easier for me.
Naturally, I thought learning how to make beeswax wraps was a great idea.
I've talked to several people about using beeswax to make reusable food wraps. Some people have concerns and other people think it is a great idea and are totally on board.
I hope to answer some of the questions you might have about using reusable sandwich wraps.
What is beeswax wrap?
Homemade beeswax wraps are typically made with 100% cotton fabrics and melted bee wax.These wraps are 100% naturally, reusable and perfect for preserving foods and covering bowls or containers.
If you are worried, make sure to find food grade fabrics to make your wraps with.
Is beeswax wrap safe?
Beeswax wraps are made with natural ingredients such as cotton, beeswax, pine resin or oils like coconut or jojoba.
The wax is melted onto the cotton fabric and pine resin and oils can be added to enhance stickiness. The melted wax keeps the cotton water proof while the resin and oils make the cloth sticky.
If you are okay with all natural ingredients, beeswax wraps are safe.
Is beeswax wrap reusable?
Yes! The waxy coating allows for beeswax wraps to be wiped off easily. Easily wash in hot water with mild soap and rinse.
You can run it under cold water to help it harden again. Allow the cloth to air dry before using again. This process can be done over and over again.
Can you microwave beeswax wrap?
You can run it under cold water to help it harden again. Allow the cloth to air dry before using again. This process can be done over and over again.
Can you microwave beeswax wrap?
Most beeswax wraps are not meant to be put in the microwave. They are to be used to fold or cover foods.
However, if you made your wraps with 100% cotton, you can put them in the microwave if they are to cold for use.
How to store beeswax wrap?
Beeswax wraps can be stored on the counter top rolled up or lay them flat. I personally like mine to be inside a towel to prevent extra dust or dirt to accumulate on top of them.
I also suggest making new wraps every few months if you use them daily or every six months for those that get less use.
How to Make Beeswax Wraps
Materials Needed
- Free Beeswax Wrap Pattern Pieces - get pattern at the end of the post
- 1/4 yard cotton fabric
- Beeswax bars or pellets
- Cheese grater
- Parchment paper
- Baking sheet
Step 1
Begin by printing out the Wrap Pattern Pieces.
The pattern comes in several sizes for different size bowls as well as sizes for wrapping sandwiches.
Step 2
Cut out your fabric using the wrap pattern pieces.
You might consider cutting the fabric using pinking shears just so the edges have a nice finish. However, this isn't necessary. The wax helps seal the ends a bit so they don't fray a ton.
Step 3
Use your cheese grater to grate down the beeswax. You'll need about a 1/4 cup of beeswax.
Step 4
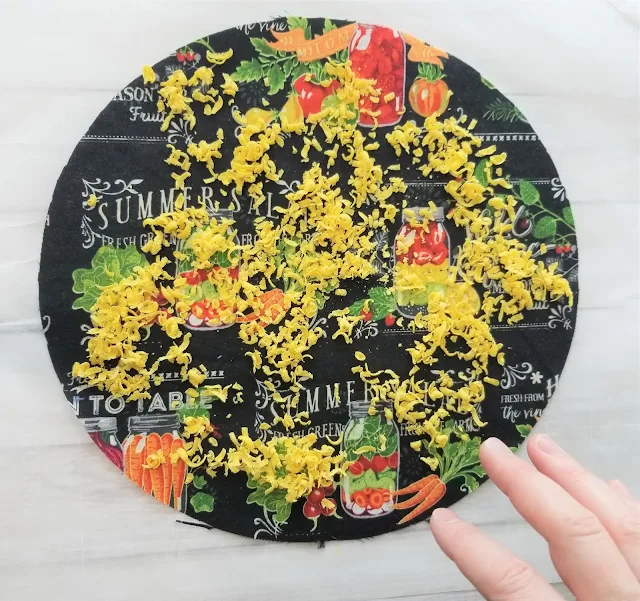
Take your piece of fabric and place it on a sheet of parchment paper. Sprinkle the beeswax evenly over the fabric.
Optional: If you'd like, you can also add pine resin, coconut oil or jojoba oil during this process. These will add to the stickiness of the wrap.
Step 5
Place the baking sheet in the over at 300° F. It should melt in about 2 minutes. Make sure to watch it so it doesn't get to hard and start to bake instead of melt.
Another option is to melt the wax in a double broiler until liquid. You can than pour the wax onto your fabric.
Step 6
Remove the baking sheet from the oven.
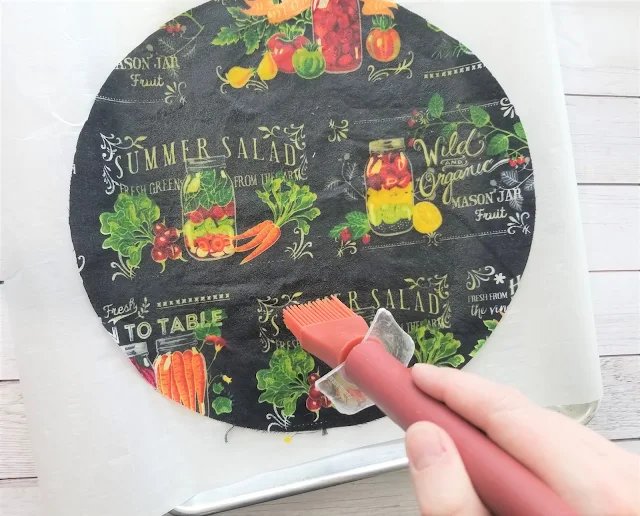
Use a brush to evenly distribute the wax around your fabric. Make sure to get all the edges as well as the center.
Step 7
Peel the fabric off of the parchment paper or wax paper and let it cool down. It should dry fairly quickly. You can also place it in cool water to cool down.
Step 8
Place the wrap over a bowl and use your hands to meld it to the bowl. The warmth from your hands should help the wax to shape to the bowl.
To store your extra diy beeswax wraps, roll them up and tie a string or ribbon around them. You can also store the flat in a cool area.
I am so glad I know how to make beeswax wraps and it really has made a difference in my budget and how I store my foods.
Plus, my kids love the fun fabrics that we can find and use for making our own wraps.
Now it is your turn!! Click the link below to download your free reusable sandwich wrap pattern and bowl covers.


I tried making the beeswax reusable bowl covers..you make it sound so easy! I really had a hard time with it...and I make most of my own moisturizers, etc... This was not as easy! I had a huge mess...and trying to get the wax to cool evenly... even with brushing it wanted to pool...It was a good experience but would not do again...now I understand why they are so expensive!!
ReplyDeleteUse the iron with parchment paper in between to melt after applying it with the brush it will melt more into the fabric and be more even
Delete