
Teachers are amazing!! Yes, I taught high school for 8 years, but even still, other teachers are amazing. I seriously bow down to elementary teachers because I could not teach all the subjects they teach and discipline 20+ small people at the same time.

This post contains affiliate links to products I recommend. I do make a portion off any you may purchase. See full disclosure here.
That is why I think making DIY teacher appreciation gifts each year for my children's teachers is a must. They should be thanked every single day not just during teacher appreciation week.
I don't mind giving the traditional teacher gift like these printable teacher gift tags. Or even just a bunch of classroom supplies (which teachers totally love).
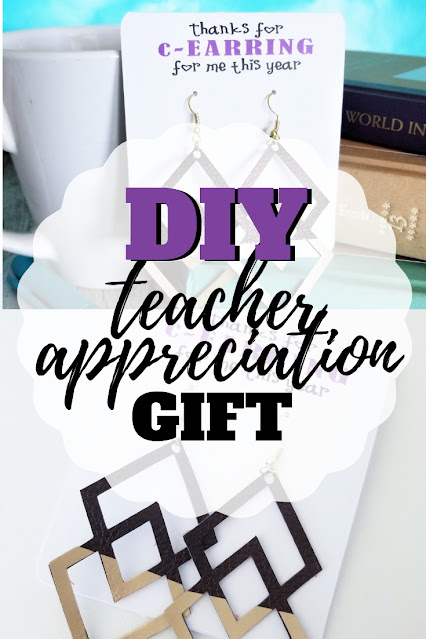
This year for our DIY teacher gift I wanted to make some fun earrings to give to all the teachers and aids. So we came up with this cute saying.


Thanks for c-EARRING for me this year.
Get it, like "caring" but with earring. Cute right?!
If you've never made leather earrings, check out these simple embossed earrings or these free earring SVGs.
This project is perfect for those that can use the Print then Cut feature on Cricut machines or Silhouette machines.
I'll be sharing how I use the print then cut feature on my Cricut Maker.

DIY Teacher Gift
Materials Needed
- Cardstock
- Glue Stick
- Cricut Maker
- Scoring Wheel
Step 1
Download the free earring card SVG at the end of the post. Upload into Design Space and flatten. Make sure to add a scoring line in the center.
Check out the video and watch how I put together the SVG and flatten the files.
Step 2
Send card to printer.


Place printed project on your mat and load into your machine. Use the scoring wheel first to score the middle. Next, switch to your fine point blade and cut out the card.

Remove card from and fold in half. Use a little glue on the bottom inside to attach the front and back.

Add your earrings to your card.
Why use print then cut for the DIY teacher gift? I like how easy it is to just print and send to my machine. Plus it cuts the holes in my cards and I don't have to figure out how to do that on my own.


No comments
I'd love to hear from you!