October is probably my favorite month of the year. Not simple because it is fall, which I love, but because there are SO many projects to get done and fun things to do with my family.
I love to keep busy and create all month long. Well, this year is no exception.
I have so many fun handmade Halloween projects to do that I am actually really glad I had already chosen and designed part of our family DIY Steampunk costumes in September.
I love to keep busy and create all month long. Well, this year is no exception.
I have so many fun handmade Halloween projects to do that I am actually really glad I had already chosen and designed part of our family DIY Steampunk costumes in September.
This post contains affiliate links to products I recommend. I do make a portion off any you may purchase. See full disclosure here.
I love to make handmade Halloween costumes each year. I've been doing it since before our 1st child was even born. But it got a lot more fun after we had kids.
One year we were characters for Toy Story, another year we all got to be characters from Teenage Mutant Ninja Turtles.
This year as I looked for inspiration I was really inspired by one of the book series that I had read earlier this year. It is called The Finishing School Series by Gail Carriger.
It was such a fun series to read and has so many cool steampunk ideas and references that I really wanted to carry out the idea I had in my head for our DIY steampunk costumes. So I did.
If you aren't familiar with steampunk, it is science fiction that is placed typically in the Victorian era and involves the use of steam power like trains and dirigibles (think airships or blimps).
I knew I wanted these DIY Halloween costumes to be a bit of a family affair which means doing a little research on Victorian clothing as well as staying true to the "invention" side of steampunk.
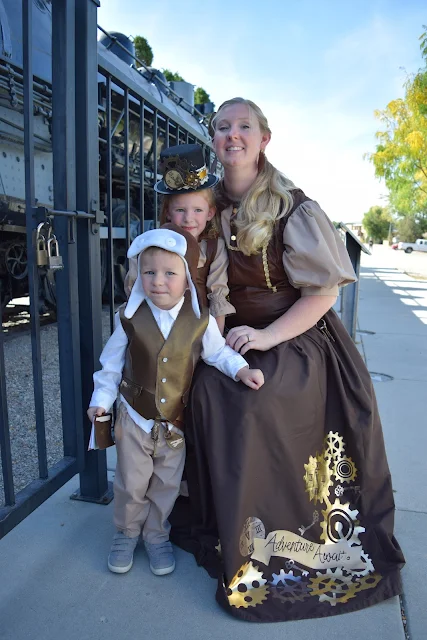
My initial idea was to create a family of travelers. They were out for adventure. Willing to travel steam powered anywhere.
The son was training to be an aviator and wished to fly the dirigibles. The daughter was excited to create and invent new steam powered projects. The mother, was just happy to see her little ones dreams come true.
Once I had my inspiration and my "character" ideas down. I started pinning like crazy fun ideas, inspirational outfits and small accessories that I loved.
That's when I started figuring out what materials I wanted to use. I knew I wanted to go with tans and browns and that I'd want to work with some types of leathers.
That's when I started figuring out what materials I wanted to use. I knew I wanted to go with tans and browns and that I'd want to work with some types of leathers.
I knew I would be using my Cricut Maker to create a LOT of accessories and vinyl cut outs for our steampunk outfits. Not only can I do SO MUCH with my Cricut Maker, but knowing I was making homemade Halloween costumes I didn't want to be paying crazy amounts of money for something my kids might only wear once or twice.
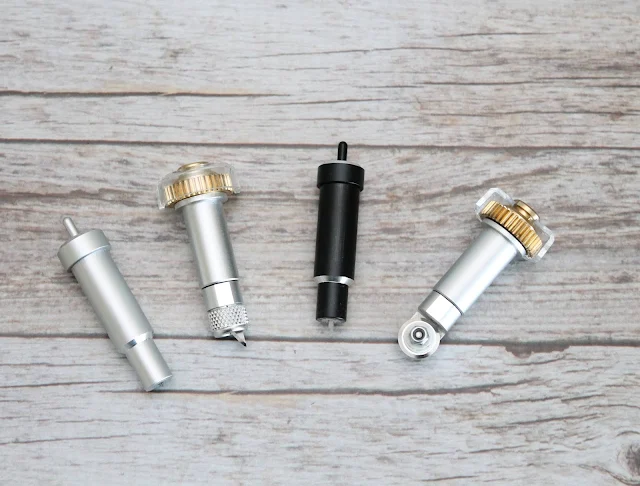
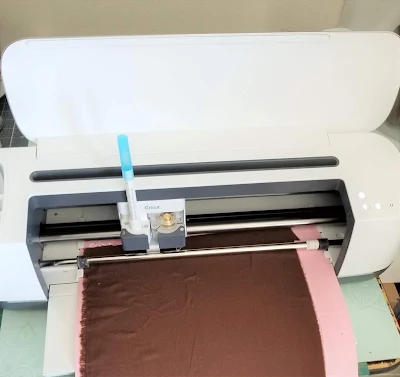
With my Cricut Maker I can cut out fabric with my Rotary blade, leathers with my Deep-cut blade and Chipboard with my new Knife Blade, plus, all the iron-on vinyl. All for the same project!
Plus, I can save money creating my own projects and customize them so my kids can enjoy them after Halloween too.
I also went into Cricut Design Space and started searching through the patterns and images available.
As I searched through Design Space, I found some really great projects like this little Adventure Notebook that I could cut out in leather and knew my children would love. (And they did.)
As I searched through Design Space, I found some really great projects like this little Adventure Notebook that I could cut out in leather and knew my children would love. (And they did.)
I also got to try out the new Cricut EasyPress 2 to add all the fun gold foil iron-on to each of our outfits. I cut out loads of gears, keys and clocks in large, medium and extra small for the bottom of our dresses, on vests, hats and accessories.
Used my printable Cricut EasyPress Temperature Guide to figure out the proper temperature for working with cottons and foil iron-on.
Used my printable Cricut EasyPress Temperature Guide to figure out the proper temperature for working with cottons and foil iron-on.
I also used my Bright Pad to weed out all the tiny iron-on gears. Let me tell you they were super tiny. But I loved the final look the brought to the outfits.
Now let me walk you through how I put together each of our DIY Halloween costumes.
How to Make DIY Steampunk Costumes
Little Inventor Costume
I have to say this Little Inventor costume was the costume that really started the entire creative process for our family steampunk look.
I knew I wanted a way to share my little girls love for creating and inventing her own projects. She is SO creative.
The first thing she does when she walks in the door after school is go outside to create. She'll draw, build, sing, dance and often create a giant mess. But I love it because she is being true to herself.
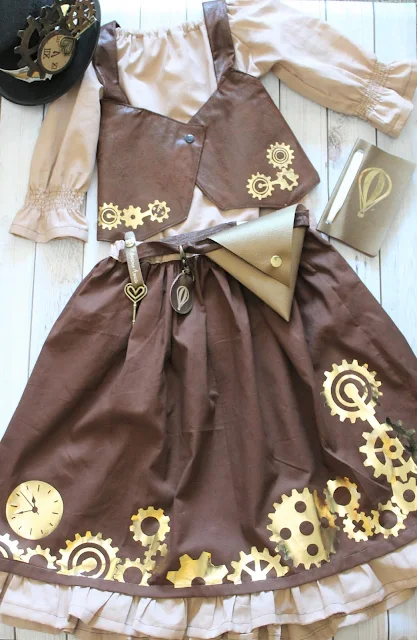
I extended the length of the bodice so it would be a shirt and I shirred the long sleeves to give it a bit more of a peasant look. (Check out this post on how to shirr.)
I used the skirt measurements from the Holly and Ivy Party dress to make the skirt and added a elastic waistband and a ruffle at the bottom.
For the corset I drafted my own pattern and added the cute little snap and the foil iron-on for some interest. I also added all the gears and clocks on the bottom of her skirt with Cricut Foil Iron-On.
If you are new to Iron-On, check out our post on How to Apply Iron-On Vinyl.
All her accessories I created in Cricut Design Space and cut out on my Cricut Maker machine.
I made a small belt that included a key chain that says Adventure Awaits, a fun key fob with a hot air balloon and the triangle pouch.
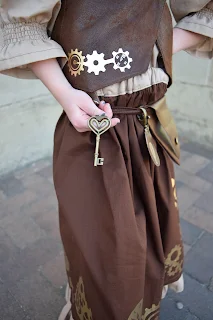

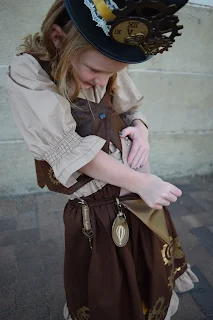
Her hat I bought and added the fun lace, gears and keys using my Cricut Maker. Check out this post to get the full tutorial on how I created the steampunk hat.
Overall, I adore this look and she had so much fun each time she put it on. She giggled and would show anyone that was around.
Tiny Aviator Costume
My 2 year old is an explorer if ever there was one. He loves to be outside, try new things and stops dead if there are cars, tractors or airplanes. I knew I wanted to make him an aviator cap and that is where his costume started.
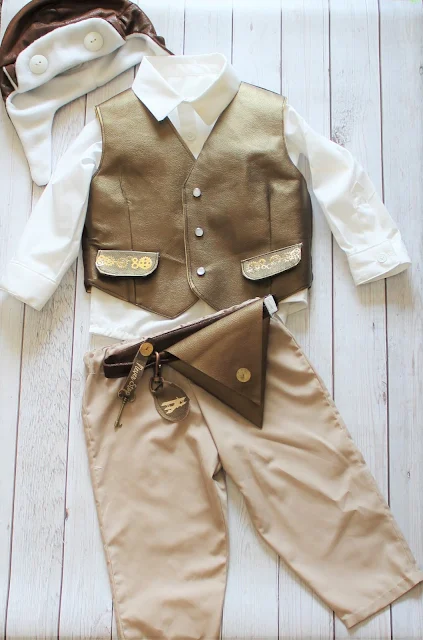
I drafted the Tiny Aviator Hat pattern myself and it is free just click here. I used the Peek-a-Boo Classic Oxford for the button up top which is perfect because he can wear it for church now.
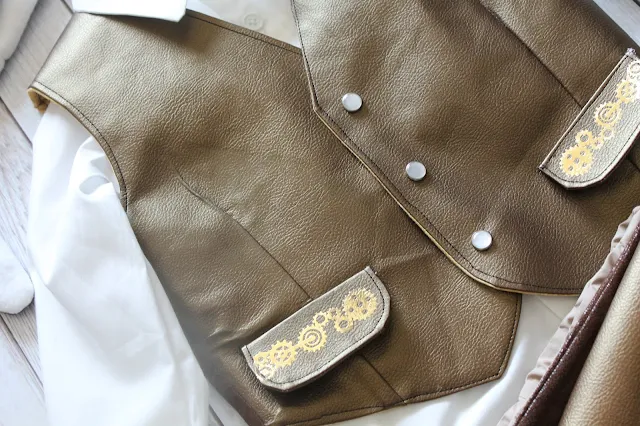
The vest is in Cricut Faux Leather and cut out using the Simplicity Child's Vest Pattern (see full tutorial below). The pants are the Trendsetter Joggers in cotton.
Like sister, he has a fun belt of DIY Steampunk accessories. Including a Key fob, key chain and triangle pouch.
I used some airplane cut files from Design Space for some of his accessories.
His vest is probably my favorite part of his outfit (but I do love that cap!!) I used my Cricut Maker to cut out the vest in both faux leather and cotton woven fabric.
Add a bit of gold foil iron-on gears and those pearl buttons. I seriously love it!
Let me walk you through the steps of cutting out a vest using your Cricut Maker.
Steampunk Faux Leather Vest
Materials Needed
- Simplicity Child's Vest in Cricut Design Space
- 2 rolls Cricut Faux Leather
- Cricut Washable Fabric Pen
- 1/2 yard of brown cotton fabric
- 1/2 yard of interfacing
- D Rings
- Pearl Snaps
- Gold Foil Iron-On Vinyl
- Cricut Maker
Step 1
Grab the Child's Vest pattern in Cricut Design Space. Load your mat with the faux leather and cut out your front vest pieces and one set of pocket pieces. Make sure to load the faux leather with right side DOWN.
Step 2
Stitch the pocket front to the lining piece around the rounded edges. Clip and grade these edges really well so you remove as much of the leather bulk as you can. Turn them right side out.
Step 3
Fold the buckle piece in half lengthwise and stitch down the long side. Cut the piece into 2 pieces and set them aside.
Step 4
Use the markings drawn on the vest with the Maker to sew darts in the front vest leather and lining pieces.
Step 5
Stitch the pocket pieces to the front of the leather vest.
Step 6
Stitch the vest back pieces together at the center back seam and press. Repeat with lining.
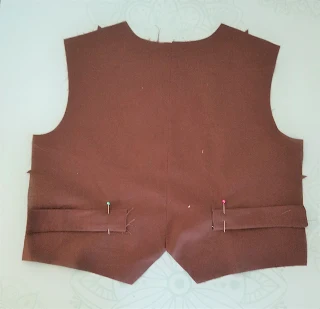

Step 7
Use the placement markings on the vest front to place the ties onto the front of the vest and stitch them down. Fold them over towards center front and stitch them again. Use the D rings to tie them off.
Step 8
With right sides together, line up the vest front shoulder seams with the vest back shoulder seams and stitch across the shoulders. Repeat with lining.


Step 9
Lay the vest front out flat with the right side up. Place the vest lining over the top of the vest with right sides together. Stitch the 2 together but leave the side seams open.
Step 10
Grade and clip all the bulky seams and the rounded and sharp edges. Make sure to take out as much of the leather bulk as you can.


Step 11
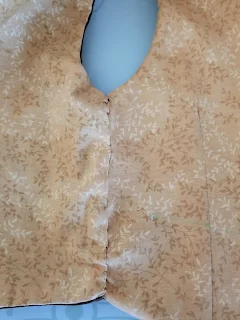
Turn the vest right side out through the side seams.
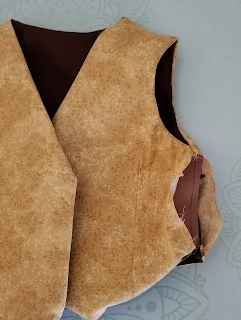
Step 12
Stitch the leather side seams together with the sewing machine. Hand sew the lining side seams closed.
Step 13
Add snaps to the outside of the vest. Use the Cricut EasyPress 2 to add fun steampunk inspired Iron-On Vinyl cut files.
In the end, the vest really made this costume into a fun aviator steampunk inspired Halloween costume.
I was worried he might be a little uncomfortable in the outfit, but he seemed to love it and wore the entire thing even though we took photos in 80° weather.
I was worried he might be a little uncomfortable in the outfit, but he seemed to love it and wore the entire thing even though we took photos in 80° weather.
Steampunk Mom
My costume was probably the hardest to figure out. Why? Because I was not willing to put a ton of time into making a full on corset for an outfit I'd wear a few times.
So I searched through the patterns I already had and came across a few that would be appropriate and I could get the look without the work.
So I searched through the patterns I already had and came across a few that would be appropriate and I could get the look without the work.
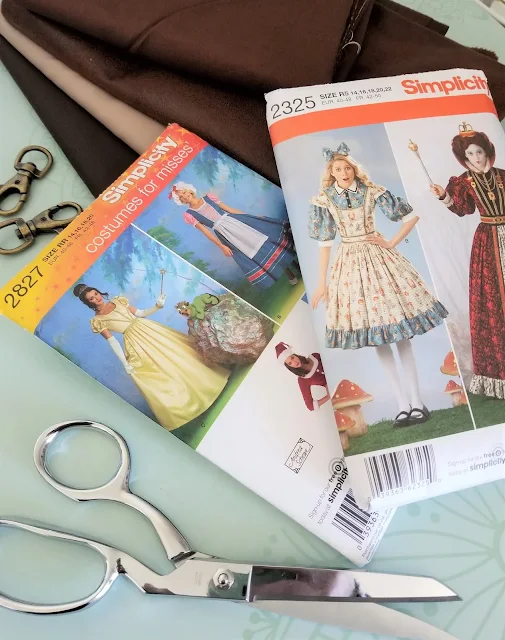
I came across two Simplicity patterns 2827 and 2325. They both had a look that I liked so I asked my followers on Instagram. They liked the 2325. So that is what I used! I'm glad I did too!
I used a faux leather from JoAnn Fabric for the bodice along with a tan cotton woven. That skirt I designed this huge Steampunk gears cut file in Cricut Design Space.
I wanted something big enough that could be seen but not take away from the entire outfit. I think it turned out well.
I wanted something big enough that could be seen but not take away from the entire outfit. I think it turned out well.
I had a fun key fob like the kids but mine had a clock. It served like a pocket watch to help me stay on time.
If you want to make your own, check out our DIY Leather Keychain tutorial and cut file.
If you want to make your own, check out our DIY Leather Keychain tutorial and cut file.
I also had these two beautiful steampunk accessories. I really loved making this hair piece.
I wasn't sure what I wanted to do but there was a great Simplicity project called Flower and Arrangement in Design Space. That I decided would be perfect.
I just added a few of my gears I cut out using chipboard and one of my chipboard clocks. It was totally perfect!!
I wasn't sure what I wanted to do but there was a great Simplicity project called Flower and Arrangement in Design Space. That I decided would be perfect.
I just added a few of my gears I cut out using chipboard and one of my chipboard clocks. It was totally perfect!!
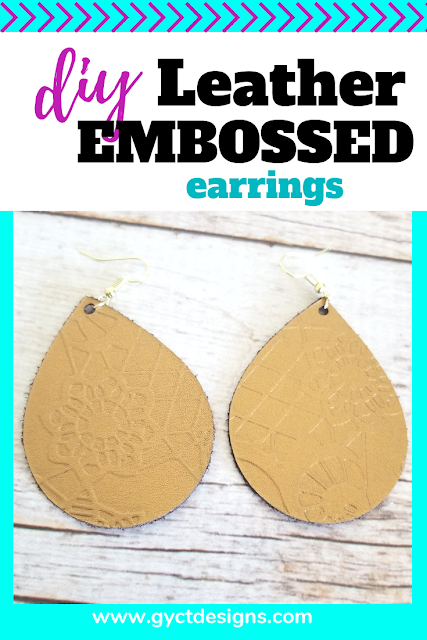
The leather earrings are my favorite accessory. I wore them to church and my sister-in-law who took all our family photos (didn't she do amazing) requested a pair as well.
So I figured I'd share here how easy they were so you can make your own!
So I figured I'd share here how easy they were so you can make your own!
Leather Embossed Earrings
Materials Needed
Step 1
Find the leather earring cut file in Cricut Design Space
Step 2
Load leather into your Cricut Maker Machine. Make sure to use your Deep Cutting Blade to cut out the leather.
Step 3
Spritz your leather with a bit of water. Take your Cuttlebug embossing folder and lay your damp leather earrings inside the folder. Place the A in between the 2 B plates and roll it through the Cuttlebug. Allow earrings to dry.


Step 4
With the pliers, open up one of the jump rings and loop it through the earring hole. Close the jump ring. Repeat with opposite earring.
Step 5
Use the pliers to open up the loop on the end of the ear wires and loop it onto the jump ring. Than close the loop. Repeat with opposite earring.
There you have it! Some really simple and beautiful earrings that are great to wear with really any outfit but make a fun DIY Halloween craft as well.
Well, I think that about wraps it up. I hope you like our fun DIY steampunk inspired costumes.
I asked my husband if her wanted a steampunk costume. He said he would pass. However, I think he secretly wants one. Plus, I think I know what to do of our Halloween party theme this year.
Well, I think that about wraps it up. I hope you like our fun DIY steampunk inspired costumes.
I asked my husband if her wanted a steampunk costume. He said he would pass. However, I think he secretly wants one. Plus, I think I know what to do of our Halloween party theme this year.
Looking for more Family Costume Ideas? Check out these
Family of Bandits from Sugar Bee Crafts
Fire Family from The Scrap Shoppe Blog
Uno Cards from Suburban Wife City Life
Angry Bird Costumes from Twin Dragonfly Designs
Roman Soldiers from Julie Measures
Rainbow and Cloud Costume from The Craft Box Girls
Where the Wild Things Are from Tried and True
Disney Food Costumes from Girl Loves Glam
Troll Costumes from Fleece Fun
Harry Potter Inspired Costumes from Crafting in the Rain


