
My junior year of college I moved into an apartment with total strangers. I was a bit afraid I'd live with some crazies. Luckily, I had the bestest roommate named Annie.
We become instant friends and went on to love all our roommates that year. We still all work to keep in touch (even though I suck at it. Love you Riv #1 ladies!!)
Now why do I mention this? Well, when your college roommate messages you asking if you could create a tutorial for this DIY toothbrush roll, because she needs one with a decent tutorial, you do it.
It is like written in stone somewhere. You are sisters from another mother. You'd cross the ocean for these ladies. So Annie, this is for you my dear friend. You are always on my mind, in my prayers and forever my Rivera sister!!

Now, I will say when Annie asked if I could do this tutorial for her. I told her I could find her one on Pinterest, but she insisted that mine would be better and she'd rather me do it.
Which made me blush a little and made my heart swell that someone I care about actually reads my blog besides my Mother...or my husband.
So just a shout out to those college, high school or elementary friends, thanks for reading my little blog. It does make my heart happy.
And if we are new friends just here in bloggy-land, I'm glad you are here also. Don't discount the fact the we are friends. It is because of all of you that I love writing this blog. I get to make new friends and inspire others to sew and create. You are all the BEST!

Okay, so moving on to the tutorial.
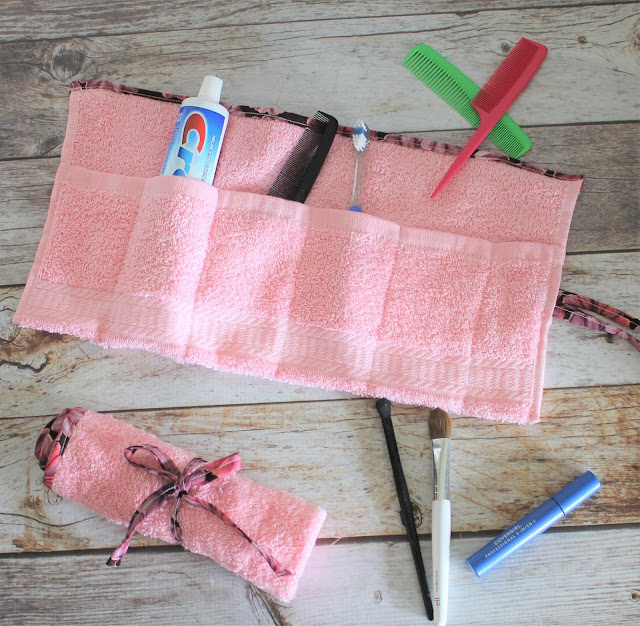
A couple things before we start with DIY toothbrush roll. This doesn't have to be just for toothbrushes. This makes a great traveling make-up and brush holder.
You could use it to roll up your pencils or do a similar project with your crayons. What makes this roll nice for toothbrushes is it is made with a hand towel which will soak up all the water (or slobber) you kids can throw at it.
This tutorial uses half of a hand towel but if you'd rather use a washcloth that would work as well. The end result would just be shorter and not as long.
Feel free to experiment, the sewing principles are the same. But over all, I hope this tutorial will help you keep those toothbrushes from getting "slimy", as my roommate Annie said. Let's get sewing!!

How to Make a DIY Toothbrush Roll
Materials Needed
- Bathroom hand towel (Cut in half)
- Double Fold Bias tape or you can make your own using this tutorial
- Thread
- Toothbrush
If you learn better by watching a video, we've got you covered. Here's a super quick video tutorial on making your own toothbrush roll. Make sure to turn your ad blockers off or you won't be able to see the video.
(Yes, that is right. Above and beyond friendship here. I made a video and step by step written tutorial Am I winning at the friend thing or what?!)

Step 1
Unfold the bias tape and place it onto the raw edge of the towel with Right Sides Together (RST). Match the raw edges and pin. Stitch the bias tape to the towel. Press.
Tip: When you cut your towel in half, the cut side will fray a ton so you either need to encase it in bias tape OR if you have a serger, you can serge across the raw edge to finish it. I like the bias tape because it gives it a little more color and a professional finish.

Step 2
Fold the bias tape over the top of the towel and encase the raw edge of the towel inside the bias tape. Pin the bias tape in place. Stitch across the bias tape.

Step 3
Fold the bottom edge of the hand towel up about 2/3 of the way. Pin the sides in place. If you aren't sure if you have enough room to hold your toothbrush or make-up, grab them and measure.
You can adjust the folded edge to whatever size you want. Typically fold up 2/3 works well for most items.

Step 4
Take a ruler and measure the width of your hand towel. Divide that number by how many pockets you would like.
Take a fabric pen and mark across the edge of the pocket so you know where to sew down each pocket. You'll want at least a 1.5" pocket to hold your toothbrush.

Step 5
With your remaining bias tape, cut 2 - 12" pieces of bias tape. Stitch them closed along the long straight side. Pin them between your pocket layers on one side of your hand towel.

Step 6
Stitch down your pocket side seams and down the markings you made on your hand towel to create the pockets.
Make sure you put a backstitch or tack stitch at the beginning and the end so that your pockets don't come apart.

Step 7
Wash of your fabric pen markings by soaking in the sink or throwing your DIY toothbrush roll into the laundry.

Tada!! See how super easy that was. And let me tell you, these would be really easy and fun Christmas or birthday gifts.
Adults and kids alike could use these for traveling or just to keep their bathroom drawer a little more organized. Perhaps you know a girl that needs a place to put all those make-up brushes.
Isn't that a handy little DIY toothbrush roll.


