Have you ever been super confused about how to layout your fabric and cutting patterns?
It could a paper pattern from the store or even a PDF pattern you've downloaded online. Maybe it says to Cut out 2 - mirror images. Or place on the fold. What do these things mean? It sounds like you need to know how to read a sewing pattern.
Today for Sewing 101 let's talk about how to use a sewing pattern more specifically, how a sewing pattern is laid out and cut.
The process of cutting patterns and fabric pieces is probably the most time consuming and stressful part of sewing.
Honestly, NO ONE likes it. So if that is something you struggle with, know that you are not alone.
This is one of the many reasons I've enjoyed using the new Cricut Maker. (It can cut out sewing projects like burp clothes and quilt pieces. It can even cut some sizes of clothing patterns!)
I thought I'd share a few tips and tricks about pattern layout and cutting to make the entire process of reading a sewing pattern is a bit less stressful.
Essential Tools for Sewing
First, there are a few essential tools that you'll need to have the most effective and accurate pattern cut.
Yes, you can look around your house to find these, but I'd suggest just purchasing them.
If you plan to sew at all you'll need them. That way you can put them away in a locked cupboard so your children don't walk away with them and use them for their own projects. (Not that I'm speaking from experience.)
You can get complete sewing kits online like this sewing kit from Cricut or this sewing kit on Amazon.
Or buy the items separately. You'll need:
- Measuring Tape -First, a measuring tape is a must. I like this one because you get 3 measuring tapes and I can never seem to find one when I need it. You can have one for your neck, one for your table and one stashed way up high so that little people can't reach it and run away with it.
- Scissors - A nice and sharp pair of scissors is a MUST. Cheap scissors can really ruin your fabric and frustrate you when cutting patterns.
- Personally I love my Ginger Scissors. They are pricey but TOTALLY worth it. Just make sure to either label them or hid them so no one uses them for any other projects.
- Sewing Pattern - You'll need a pattern to start. You can use a paper pattern from the store.
- Or we have easy instant downloadable PDF sewing patterns in our Sew Simple Home Shop. If you are new to the PDF pattern world, you'll be hooked in no time.
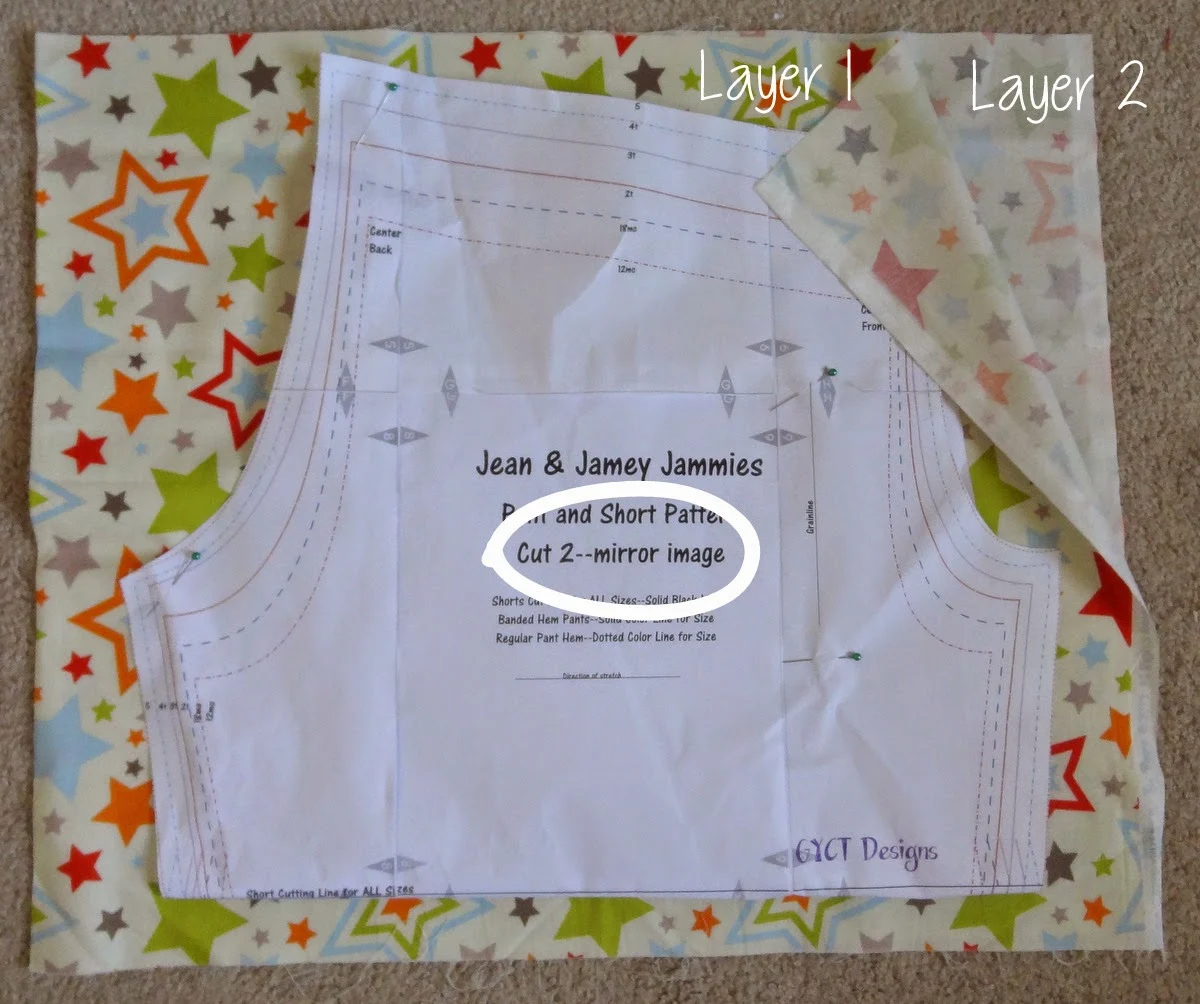
- Current, trendy and you can print them right from home. The pattern I'm using in this tutorial is the Jean and Jamey Jammies Pant pattern {pictured in the middle}.
How to Read a Sewing Pattern
All patterns are a little different, especially now since there are so many PDF pattern designers and each one does things a little different.Understanding how to read a sewing pattern has changed a bit in the last 10 years. However, most patterns have similar pattern markings to help you identify what to do or where something is located on the pattern.
Each pattern designer usually uses their own set of markings and the more you use that designers patterns, the easier it is to learn to read their patterns.
These markings will be found on the actual pattern pieces and you'll need them to know how to lay your fabric out for cutting and where to mark for things like buttonhole placement or zippers.
If you are interested in sewing with paper patterns, check out our tips and tricks for working with paper patterns.
How to Layout a Sewing Pattern for Cutting Patterns
Okay, now we need to know a little bit about how to read a sewing pattern. This is where understanding the Fabric Anatomy becomes important. Each pattern has different "parts" or anatomy as does fabric.
Lay your fabric on a flat surface. If your pattern says to "Cut 2", you'll want to fold your fabric half with your selvages together. (If you are unfamiliar with the word selvage, check out our Fabric Anatomy post.) Notice the selvages are on the right side and the fold is on the left.
What if my sewing pattern says mirror or mirror image?
This is a fairly new term we see in many PDF patterns. If your pattern says "mirror" or "mirror image" this means the designer wants you to cut 2 pieces of the pattern that are exactly opposite of each other.Why? Well, do you have a right leg and a left leg? Or a right side of your bodice and a left? This ensures that your pattern pieces are opposite from each other and you don't end up with 2 right leg pieces. (Been there, done that).
Easiest way to cut "mirror images" is to have your fabric folded in half like the example above and then pin your pattern.
How to Find the Grainline on a Pattern
Before you start pinning your pattern down, you want to ensure your pattern is on grain.
Why does this matter?
Well, have you ever had an article of clothing that always pulled to one side or the other. That is because the fabric wasn't cut on grain and once sewn it always pulls to try and get on grain again.
First thing to do is find the grainline on your pattern. This should be a line on the pattern and should be marked. The grainline should always be parallel with the selvage. Even if your grainline is crosswise or bias, it will need to be parallel to the selvage.
To ensure this, grab your tape measure. Line your tape measure up at the top of the grainline across to the selvage. Take that measurement. So below it is about 6.75". Now pin the top of your grainline to the fabric.
Move your tape measure down to the bottom edge of the grainline. Measure from grainline to selvage. This should measure the same as the top edge.
If it doesn't, move your pattern piece until it does. Then pin. That is how you ensure your pattern is on grain. Now you can finish pinning and start cutting out your fabric pieces.
What does Place on Fold mean?
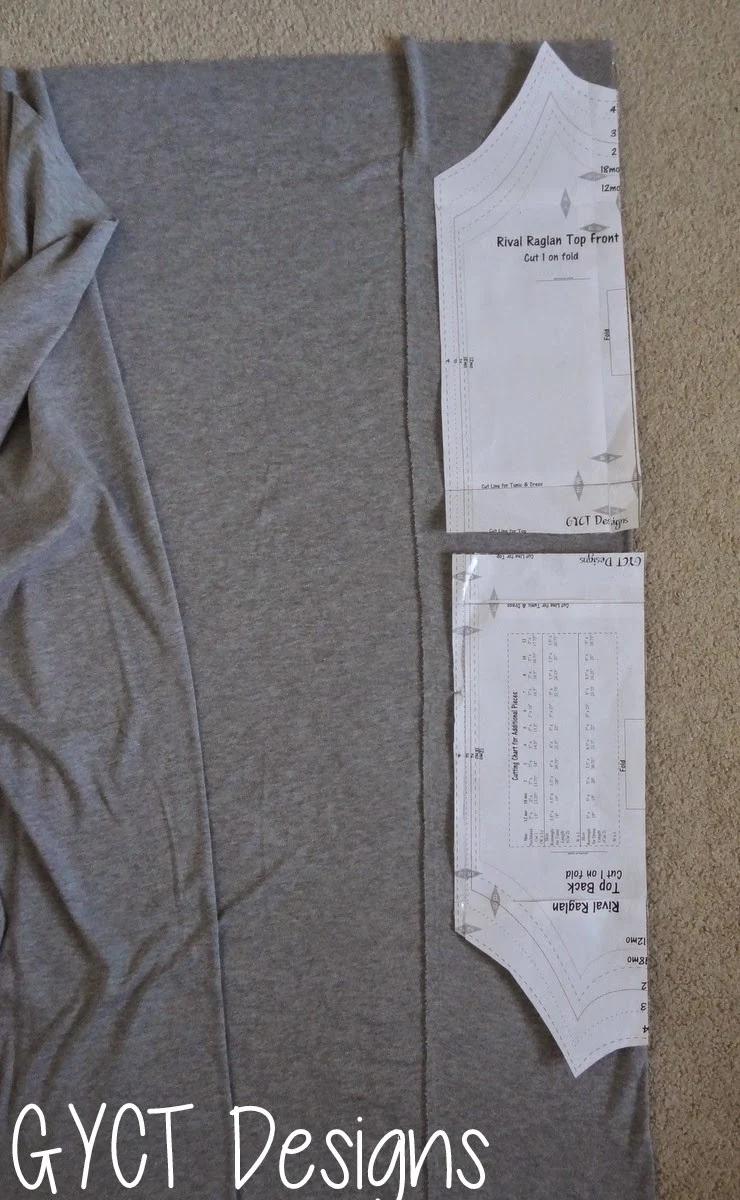
If a pattern piece is to be placed on the fold, the principle of grainline is still the same. The only difference is you should have a pattern symbol similar to the one below. Helping you know to place the fabric on the fold of the fabric.Like with our Rival Raglan pattern. Most of the pieces are to be cut on the fold. Again, prepare your fabric. One side should be on the fold and the other matching selvages. If you wish to save on fabric, you can fold only a short side of your selvage in.
Now place your patterns on the fold. Pin the top of folded side and then pin the bottom folded side. Continue pinning and then cut it out.
Remember it's all about Practice, Practice, Practice!


Thankyou Chelsea your tips on how to read a pattern has truly helped me a gr8 deal looking forward to your tips on many of my projects xxxxc
ReplyDelete