
Today we have Ajaire from Call Ajaire sharing her awesome tote tutorial. You will TOTALLY love this.
Now that the summer feels like it's winding to a close, are you as sick as I am of sand at the bottom of your bag? If so, then this Sand Free Beach Tote is the perfect solution!

The secret to keeping sand out of the bottom of a beach tote is letting the sand fall through the bottom. I decided to make a tote with a mesh insert at the bottom that would keep all the toys and various beach items inside, but easily let all the sand fall right out.

I found this great mesh material at JoAnn Fabrics which is soft and washable, but is sturdy enough to hold objects that would push against it at the bottom of the bag. It's the type of mesh you'd use to make bags for delicates to go through the washing machine.

The best part of this bag though, is that it completely opens up to be a little blanket as well. You may be wondering about sand coming up through the mesh section in the middle, but actually I found it was a great place to sweep away the sand that gathers as my daughter wanders all over the blanket with her sandy toes.
So are you ready to make your own Sand Free Beach Tote? To start with you'll need the following materials:
2 3/4 yards of fabric
1 package of single fold bias tape
1 yard of mesh
4 yards of 3/4" twill tape

You'll need to decide what size you'd like your tote to be. I used 45" diameter including seam allowance so that I could use the width of my quilting cotton, but the specific size is up to you. We'll use a 1/4 circle template to cut out the fabric, so draw out your circle and then cut off one quarter of the shape to make your template. (I drew my template digitally and then printed it out, but there are lots of ways to do this if you google it.)

Cut a smaller arch out of the inner circle, which is where the mesh will be. Save the inner 1/4 circle as a template for the mesh and use the larger piece for creating the doughnut shape out of the main fabric.

Fold your fabric twice - once in half the long way and the next time in half the short way - so there are two sides that have folds. Place your template along those folds and cut the "doughnut" shape out of your fabric. Repeat this to make another doughnut.

With the mesh, you'll fold it twice the same way you did with your fabric. The mesh template doesn't have seam allowance at this point, so when you cut out the mesh add a bit to the curved edge so the mesh circle will end up being big enough to seal the edges inside the doughnut of main fabric. Repeat this to make second mesh circle.

At the edge of one of the doughnuts, mark 1 1/2" in from the outer circle. Make another mark 10" over from the first mark and 1 1/2" from the edge. These marks are where we'll make buttonholes for the twill tape to go through. Make two more marks directly across the circle from the first two. Sew the buttonholes using your sewing machine, making sure the holes will be big enough for the 3/4" twill tape to pass through.

Pin your two big doughnuts - one with buttonholes and one without - right sides together and sew completely along the outside edge.

Turn the doughnut right side out and press the edge so that it's a smooth circle. Stitch another line around the outside edge about 1" from the edge which will contain the buttonholes and act as a channel for the twill tape.

Sew the single fold bias tape to the inner edge of the doughnut on the top and press the seam toward the bias tape. Repeat with the doughnut on the bottom.

Put the two mesh circles together so there are two layers of mesh. Take the double mesh circle and sandwich it in the center of the doughnut. Line up the bias taped inner circles (you'll be able to see how they line up through the mesh so it's not too difficult) and pin through the mesh. I used a lot of pins for this step to make sure the mesh edges would be completely sealed inside the doughnut.

Sew through all the layers close to the edge of the bias taped inner circles. This will conceal all the raw edges.

Using a safety pin, thread the twill tape through the channel, weaving it through the buttonholes to form the handles.
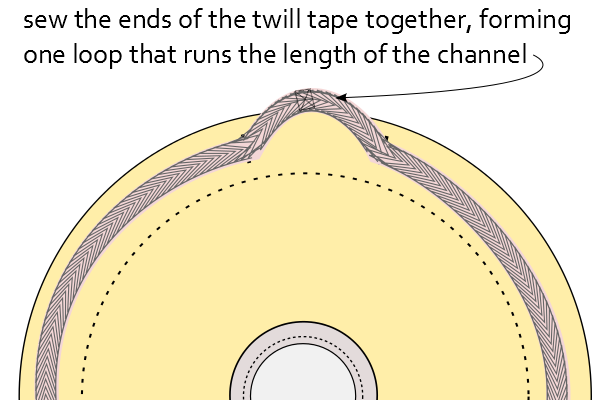
There doesn't need to be too much slack on the twill tape as long as when the blanket is flat there is enough twill tape to allow the edges to lie completely flat. Sew the ends of the twill tape together, forming one loop that runs the length of the channel.

Your Sand Free Beach Tote is complete and here's a fun .gif that shows you just how easy it is to go from blanket to tote by pulling the twill tape handles! If you make one for yourself I'd love to see it. You can find me on Instagram!
Now that the summer feels like it's winding to a close, are you as sick as I am of sand at the bottom of your bag? If so, then this Sand Free Beach Tote is the perfect solution!

The secret to keeping sand out of the bottom of a beach tote is letting the sand fall through the bottom. I decided to make a tote with a mesh insert at the bottom that would keep all the toys and various beach items inside, but easily let all the sand fall right out.

I found this great mesh material at JoAnn Fabrics which is soft and washable, but is sturdy enough to hold objects that would push against it at the bottom of the bag. It's the type of mesh you'd use to make bags for delicates to go through the washing machine.
The best part of this bag though, is that it completely opens up to be a little blanket as well. You may be wondering about sand coming up through the mesh section in the middle, but actually I found it was a great place to sweep away the sand that gathers as my daughter wanders all over the blanket with her sandy toes.
So are you ready to make your own Sand Free Beach Tote? To start with you'll need the following materials:
2 3/4 yards of fabric
1 package of single fold bias tape
1 yard of mesh
4 yards of 3/4" twill tape

You'll need to decide what size you'd like your tote to be. I used 45" diameter including seam allowance so that I could use the width of my quilting cotton, but the specific size is up to you. We'll use a 1/4 circle template to cut out the fabric, so draw out your circle and then cut off one quarter of the shape to make your template. (I drew my template digitally and then printed it out, but there are lots of ways to do this if you google it.)

Cut a smaller arch out of the inner circle, which is where the mesh will be. Save the inner 1/4 circle as a template for the mesh and use the larger piece for creating the doughnut shape out of the main fabric.

Fold your fabric twice - once in half the long way and the next time in half the short way - so there are two sides that have folds. Place your template along those folds and cut the "doughnut" shape out of your fabric. Repeat this to make another doughnut.

With the mesh, you'll fold it twice the same way you did with your fabric. The mesh template doesn't have seam allowance at this point, so when you cut out the mesh add a bit to the curved edge so the mesh circle will end up being big enough to seal the edges inside the doughnut of main fabric. Repeat this to make second mesh circle.

At the edge of one of the doughnuts, mark 1 1/2" in from the outer circle. Make another mark 10" over from the first mark and 1 1/2" from the edge. These marks are where we'll make buttonholes for the twill tape to go through. Make two more marks directly across the circle from the first two. Sew the buttonholes using your sewing machine, making sure the holes will be big enough for the 3/4" twill tape to pass through.

Pin your two big doughnuts - one with buttonholes and one without - right sides together and sew completely along the outside edge.

Turn the doughnut right side out and press the edge so that it's a smooth circle. Stitch another line around the outside edge about 1" from the edge which will contain the buttonholes and act as a channel for the twill tape.

Sew the single fold bias tape to the inner edge of the doughnut on the top and press the seam toward the bias tape. Repeat with the doughnut on the bottom.

Put the two mesh circles together so there are two layers of mesh. Take the double mesh circle and sandwich it in the center of the doughnut. Line up the bias taped inner circles (you'll be able to see how they line up through the mesh so it's not too difficult) and pin through the mesh. I used a lot of pins for this step to make sure the mesh edges would be completely sealed inside the doughnut.

Sew through all the layers close to the edge of the bias taped inner circles. This will conceal all the raw edges.

Using a safety pin, thread the twill tape through the channel, weaving it through the buttonholes to form the handles.

There doesn't need to be too much slack on the twill tape as long as when the blanket is flat there is enough twill tape to allow the edges to lie completely flat. Sew the ends of the twill tape together, forming one loop that runs the length of the channel.
Your Sand Free Beach Tote is complete and here's a fun .gif that shows you just how easy it is to go from blanket to tote by pulling the twill tape handles! If you make one for yourself I'd love to see it. You can find me on Instagram!
-----------------------------
Still looking for some great ways to organize your home and self? Power of Moms has a great free Master the Whirlwind ebook. It's free and has loads of great tips and tools to help master your space and family.


I knew you'd do something like this after you took that other bag to the beach! Does it come with the manly arms that pull it all together?
ReplyDeleteHaha Thanks Amy! You need to head my marketing team ;)
ReplyDelete