How about we talk about vintage stockings today?
My husband still has his stocking from when he was young. It was handmade for him by his mother. Now, why does this matter? Well, his mother passed away when he was in high school so it has extra sentimental powers. Naturally, when we got married he wanted to use his stocking. Which presented the challenge for me, do I really want to "match" his stocking for our entire family? I decided I was up for the challenge.
So for the last 10 years, as our family has grown, so has our stocking collection. However, this year we needed an "upgrade". Over the years I had changed my method of adding each persons name. So they didn't all match. And, as often happens when you get to child #3, his stocking had yet to be made. But I am happy to say, that is not the case anymore.
So today, I thought I'd share my own, inexpensive vintage stocking hack. It is inexpensive, fair quick and turns out really adorable.
Let's get sewing!
Supplies Needed
- Felt Stocking (these are super similar to the ones I've gotten)
- Felt Squares in variety of colors
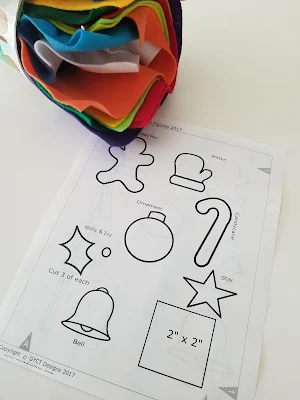
- Felt Decoration Pattern
- Sequins
- Fabric glue
Step 1
Grab felt stocking. It doesn't have to be expensive. Case in point: this one is from the dollar store. Yep, super cheap. Now, use your seam ripper and take off the white cuff at the top. Which also means you'll take of the red loop that you use to hang the stocking. I also removed the cute little trim.
Step 2
Take the white cuff and add a name. (You could pick a random one, but perhaps one of your people's names would be appropriate.) I used my embroidery machine. Mostly because I didn't like the gold puff paint I'd used on others. Make sure you check on placement of the name. You don't want it to be off center with your stocking.
Step 3
Grab your Felt Decorations Pattern and your felt pieces. They aren't super big so scrap pieces would work out just fine.
Choose your colors and cut out your cut designs. I'll give you a hint on what helps the most when layering your colors. Cut your main bottom piece out completely. Then cut out all the smaller pieces. This way you can glue your smaller pieces right on without trying to make sure everything matches and lines up.
Step 5
Using your fabric glue, start gluing all your pieces to your stocking. You can also add sequins to each design to make it sparkle. (And who doesn't love a little sparkle?) If you really love to hand sew, you can whip stitch or blanket stitch around each felt piece. But you don't have to. See there's beauty in simplicity.
Step 6
Fold your white cuff in half with right sides together. Pin the red loop to the top edge. Stitch down the side seam. Turn it right side out.
Step 7
Place the cuff around the stocking piece. They should overlap about 3/4". Pin. Then stitch the cuff to the stocking.
Now go hang those cute stockings up for everyone to see. I promise they look really awesome once you hang them over your fireplace.
Want the free Felt Stocking Figures? Simply click the button below to download them.


.jpg)


No comments
I'd love to hear from you!