Last month we took a family vacation to Disney. To prepare I made the littles several Disney outfits and I also made them some fun autograph books (check them out here). But I had a problem. I didn't want to carry around my DSLR camera bag the entire time. I wanted my camera, but I really didn't want to carry EVERYTHING with me.
Since this is Disney and I wanted to capture all the fun my little ones had, I wanted my camera. But carrying my entire camera bag and equipment was not an option with 2 kids under the age of 5 and all the fun that comes with that. So I decided I needed an alternative. This simple camera cube carrying case for my DSLR camera cube project was the perfect solution.
This post contains affiliate links to products I recommend. I do make a portion off any you may purchase. See full disclosure here.
I just placed my camera in my cube and put it into my bag, stroller, diaper bag...really whatever was around. It was cozy and safe, but still ready when I needed it.
Materials Needed:
1/2 yard fabric - I actually used a PUL fabric because of it's waterproof features, but you don't have to do that.
Batting
Thread
Hood and Loop Tape
Fabric Marker
DSLR Camera - for your information I use the Canon Rebel 3
Measuring Tape
Step 1
First you want to measure your DSLR camera. You'll need to know the height, width and depth with the lens you use the most.
Next you'll need to cut out a "T" shape. This is the most difficult part, mostly because every camera and lens is different. I'd suggest using a large piece of pattern paper or butcher paper to help you with the measurements. Use the guide below to help you with your measurements.
Cut out 2 "T" in fabric and one in your batting.
Step 2
Place your two "T" pieces with right sides together. Stitch across the top of the "T" and then around the base of the "T". Leaving the 2 sides of the "T" open.
Step 3
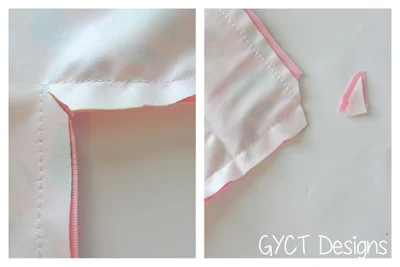
Clip into the corners of your "T" and trim the edges.
Step 4
Turn your "T" right side out. Press all your corners and edges out. Press with iron.
Step 5
Insert your "T" of batting into your fabric "T". Pin it in place at the corners and edges. This will help you as you sew.
Step 6
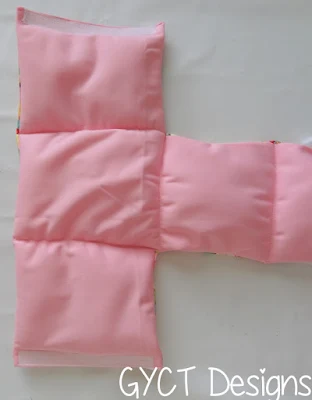
Using a fabric marker, draw lines where you will fold the cube. You should have 4 lines like the picture above. Now stitch down these lines. To keep your batting and fabric from moving, you can pin along each line.
Step 7
Measure the short edge of the "T" and cut 2 pieces of Hook and Loop tape. Separate the hook side from the loop side. Pin the Hook side to the wrong side of short side of the "T". Stitch it in place. Repeat on the opposite short "T" side.


Step 8
Flip your "T" so the right side is up. At the base of the "T", pin the Loop side of the Hook and Loop tape on either side of the base. You can see how that was done above. Stitch your loop pieces to the "T".
Your done!!! Now grab your camera and fold up your cube.
See super simple!!! Now go place it in your purse or bag and your camera is ready for action and won't get ruined with all the other items in the bag. You could even add a little pocket on the outside of the cube for your lens cap or other camera items.


I need to make one of these for myself!! Thanks for sharing the tutorial. Pinning!!
ReplyDeleteYou will love it Sheena! Super fast and great for the summer.
DeleteI'm so making one these for my beach vacation this summer.
ReplyDeleteI can't imagine our last trip if I had to have taken our camera case!! It would be great for the beach. It will keep the camera safe from all that sand.
DeleteYes! I need one of these when we go for hikes and I want my DSLR but not all the baggage that goes with it. Thanks for this tutorial!
ReplyDeleteHope you enjoy!!
DeleteOh gosh. Genius idea! I constantly throw my camera in my purse (rather than my camera bag) when we are out and about and I don't need the extra lenses. Adding this to my never-ending "to make" list.
ReplyDeleteThese blogs and articles are fully good enough for me.
ReplyDeleteclick here
If you are after something with better resolution than a mobile snap, then there is a never-ending number of options available for every camera enthusiast, from point and shoot, digital cameras, SLRS, digital SLRS and much more. camera instructions
ReplyDeleteYou have a genuine capacity for composing one of a kind substance. I like how you think and the way you speak to your perspectives in this article. I concur with your mindset. Much obliged to you for sharing. vlogging camera review
ReplyDelete