

Hi everyone I am Jonie and I blog over at Knot Sew Normal. I blog about sewing, crocheting and other crafty adventures. I am so excited to be here today to share how to make a Peter Pan costume Tutorial. I am sharing how to make all the accessories over on Knot Sew Normal today so make sure to go check those out. We are headed to Disney World for Halloween and my son and daughter decided to dress as Peter Pan and Tinkerbell for the Halloween Party.

I started browsing around for a tutorial for a Peter Pan tunic and almost everything was either fleece or felt. I knew that my hot-natured son would burn up in Florida in fleece or felt.
I wanted to use a woven for the shirt and since I couldn't find a tutorial I decided to create one. This is a bit more time consuming than fleece or felt, but the results are worth it. Here is how I did it.
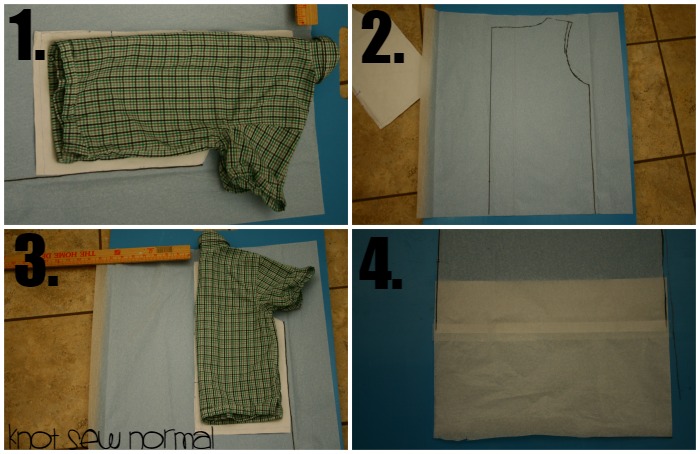
- Grab a button up shirt and some paper, fold the shirt in half and trace a line along the outside of the shirt.
- Measure 2-3 inches out from center and mark, draw a line to give your center fold. (You want the shirt to be larger, since it is woven and it won’t stretch)
- Using your shirt as a guide draw your neck, shoulder and armhole lines.
- My paper wasn’t long enough so I folded a piece of paper in ½ and taped it to the bottom. This is the section where we will make the bottom points on the shirt. (since you are doubling your paper you will automatically have your facing pattern.

- Roughly divide your sectioninto 3rds and draw your triangles for the points on your shirt.
- Cut out triangles and separate your facing piece from your shirt piece.
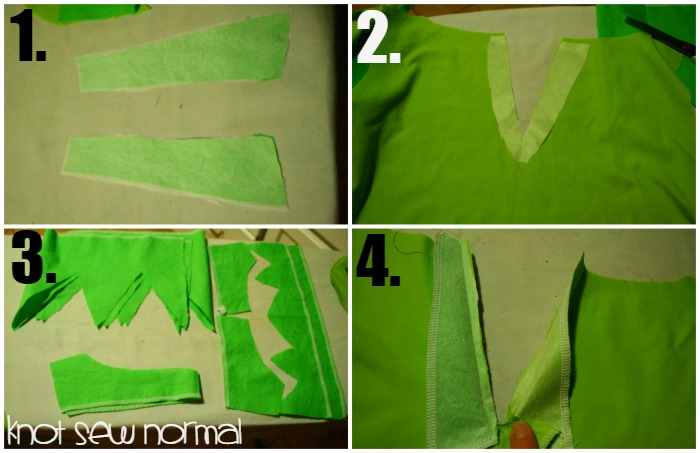
- Mark the shape you want your slit in the front. Make sure to make this big enough that it will go over your child’s head.
- To make the facing to go along your slit, lay your body piece with the slit folded in lined up with a piece of paper and trace the angle onto your new paper. Draw a line straight across at the bottom and cut out your pattern piece. (It is helpful to label everything as you go.)

- To make back collar facing you are going to lay your neckline along a piece of paper and trace the neckline and about ½ of the shoulder line. Add your seam allowance to shoulder line.
- For the front neckline facing just fold in your slit line and mark a dotted line there. Cut 1 neckline facing on fold at solid line for the back, cut 2 neckline facings on the dotted line (mirror images)
- To make your sleeve and sleeve facings, lay the sleeve portion of your pattern on another sheet of paper, I placed mine about 5 inches in from the edge, That way all I have to do is trace the curve and then draw in the top line.
- place another piece of paper under your sleeve pattern and draw your triangles for your sleeves, once again dividing the area in 3rds. you will want 2 ½ triangles and 1 full triangle.

- Cut out your sleeve and facing pieces.
- To make my collar pieces I traced the neckline on a piece of paper and then just sketched my collar out. After I got the piece to look like I wanted it I added my seam allowance to the inside, outside and shoulder sections. To get my front collar I traced my back collar (including seam allowances and the sketched the collar points)
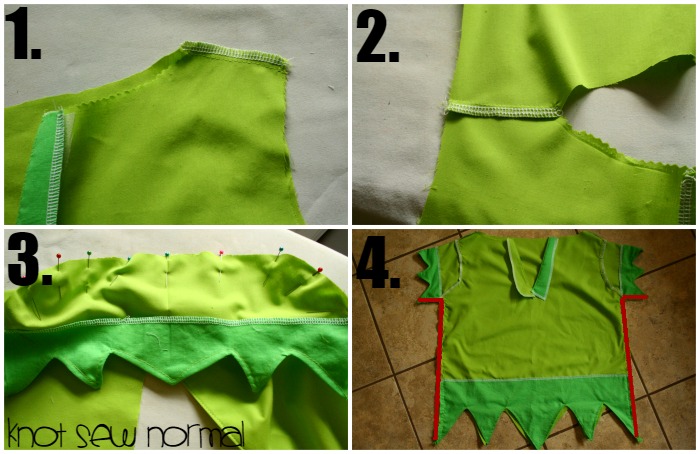
- Apply interfacing to front facing piece
- Apply interfacing to wrong side of shirt where facing will be.
- Finish the outer edges of all of your facing pieces. I used a serger, you could zig zag stitch or fold it under ¼” 2 times and stitching.
- Place front facing pieces on each side of the front slit and stitch using a ¼” seam allowance. Fold facing to the inside, press and topstitch.

- With right sides together attach your bottom shirt facing to the bottom of the shirt using a ¼” seam allowance, repeat for both sleeve facing and sleeve pieces.
- Clip the corners and trim down your seam allowance. I use pinking shears it make the process a lot faster.
- Turn your pieces right side out and use a point turner to poke out the points, press your pieces well. BTW, doesn’t my sleeve piece remind you of the Incredible Hulk or is that just me?!?! Maybe I have been watching too much Avengers.
- Topstitch along the edges of the pieces.
- Place front and back right sides together and stitch together at shoulders with ½ inch seam allowance, finish your seams.
- Press seams towards front.
- Pin sleeve to armhole matching center and outer points. Stitch using ½ inch seam allowance. Finish and press seams.
- Match side seams up and stitch from sleeve through the bottom. Finish and press seams.

- When I sewed the sides together I had these little overhangs and this is how I fixed it.
- I cut it even with the point
- Finish that edge.
- Stitch it down for about ½ inch.
 At this point try your shirt on your little person to check the fit. My back neckline was WAY too big so I just made a pleat at the top. After I ironed the pleat I basted it.
***I apologize, but I am missing a few pictures. When I downloaded everything these last ones were “corrupted” I will fill you in with other pictures and illustrations.
At this point try your shirt on your little person to check the fit. My back neckline was WAY too big so I just made a pleat at the top. After I ironed the pleat I basted it.
***I apologize, but I am missing a few pictures. When I downloaded everything these last ones were “corrupted” I will fill you in with other pictures and illustrations.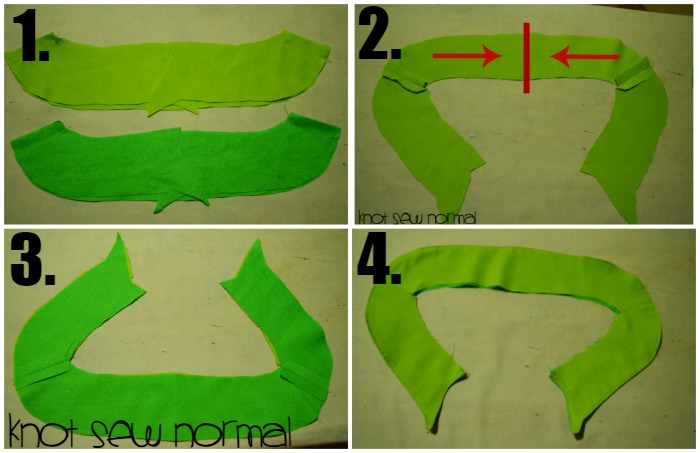
- I had already placed my collar and facing pieces right sides together and sewed them with ½” seam allowance before I realized the back was too big.
- On both the back collar and the back facing pieces I cut them down the middle and moved them together to match the newly pleated back shirt piece. I cut out the excess and stitched them back together using a ¼ seam allowance.
- Place the collar pieces right sides together and stitch around the outside edge using a ¼ inch seam allowance. Clip around the curves.
- Turn the collar right side out, press and top stitch the collar.
- Place shirt right side up
- Place collar on top right side up, matching shoulder seams
- Place facing wrong side up, matching shoulder seams
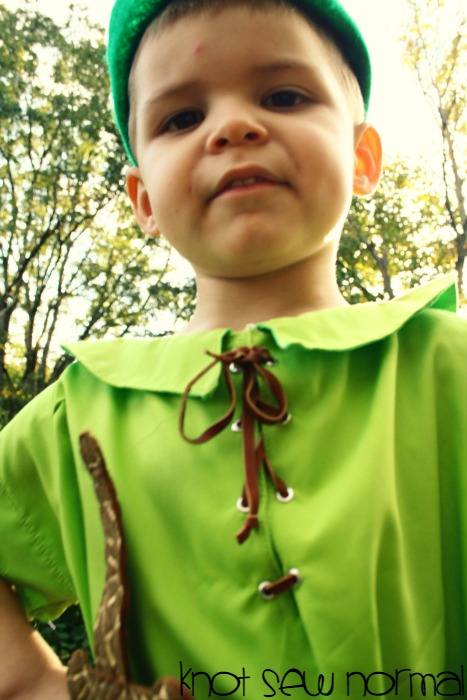
I decided to place grommets and leather strapping along the v-neck for an added bit of interest. Just follow the directions on the box of grommets to install them. I placed mine every 1 ½ inches and then used leather strapping from the jewelry section of the craft store.

Add in Tinkerbell and you have a Peter Pan ready for all types of Neverland Adventures. Thank you so much for joining me on how to make a Peter Pan costume. If you want to make all the other accessories head over to Knot Sew Normal for the tutorials on the hat, belt, shoe covers, holster and dagger. I want to say a BIG thank you to Chelsea for inviting me to be part of the 31 Days of Halloween here on GYCT. Halloween is my favorite holiday so I was so excited to share a tutorial with all of her readers.
Like to sew for Disney? Check out our Sew Disney Bound Facebook Group for inspiration or to share your own creations


