

We have foxes. No not like pets. Mostly they just come onto our property and eat our chickens. Despite the fact that they eat my chickens, they are pretty darn cute. And my kids like to watch them.
Since we have foxes, it is only natural that they LOVE "What Does the Fox Say?" My baby girl can even sing along to parts. (Never mind that my 4 year old knows the entire song. I blame my husband.) So I figured for this months FREE pattern, I would make a Fox Fabric Coin Purse.

This post contains affiliate links to products I recommend. I do make a portion off any you may purchase. See full disclosure here.
Once I was done sewing up this cute fox, my son wouldn't let me have it to take pictures.
Aren't kids fun!! I am glad he liked it. I thought, I have got to share. I know my kid isn't the only one in love with the fox. So today, you can get the Fox Pattern and Tutorial for FREE too!!!! (Lucky duck, or should I say Fox.)
I decided to have a few of friends test the pattern for me. That way I could make it all nice a pretty and I could add it to my shop.

How to Make the Fox Fabric Coin Purse Pattern
Materials Needed:
- Fox Coin Pouch Pattern pieces - get them at the end of the post
- 1/8 yard main fabric
- Scrap fabric
- Interfacing
- Heat n' Bond Transfer Paper
- Zipper (any size will work, but a 5" is best)


Cut out your fox head pieces and apply interfacing to the
wrong side of the fabric.

Trace the eyes, ears, nose and muzzle pieces onto fusible
transfer paper. Cut them out and press
them onto your fabric pieces.
Then cut out each of the pieces. Transfer paper
has a glossy sheen and can be fused to fabrics.

Take your fox face front and place your ears, nose, ears,
and muzzle pieces on the right side.
Once they are where you want them, press
them in place.

Once the pieces are pressed, carefully stitch them in place
with your sewing machine.
You can use a straight stitch, as pictures, or a
zigzag or decorative stitch such as a blanket stitch.
The big thing is to stitch
them down. If you don't, they will eventually fall off. Trust me, I speak from
experience. :)

Next, take your two head back pieces and your zipper. Unzip
your zipper, and place one side on the straight edge of the bottom fox head.
You'll want the teeth pointing down.
Stitch
in place using your zipper foot. Repeat with opposite head piece and zipper.
Once
it is sewn on, press down the sides carefully! If your zipper is plastic it
could melt under the iron.

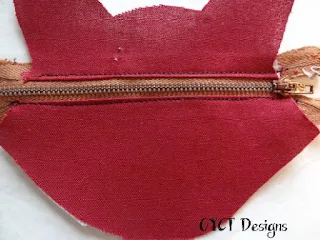
Next, topstitch down the head pieces to the zipper. As seen
above. Now unzip the zipper half way.

With Right Sides Together, put the head front and back
pieces of the coin purse pattern together.
Stitch around the two pieces. Clip around the rounded edges
and at the pointed ears.
Also, cut your zipper ends off. Only cut the part of
the zipper that is outside of your stitching. You don't want all that extra
bulk.

Step 8
Pull the fox right side out through the zipper.

Step 9
Gently push all your corners and curves out. Press flat.
Be
careful again to not press your zipper if you used a plastic one. You don't
want it to melt!

Now you have a cute fox coin purse pattern that you can collect all those coins in. This makes such a great gift and is a great first zipper sewing pattern. Can't wait to see all your great Fox Fabric Coin Pouches!
Want the Fox Coin Pouch pattern pieces? Simply click the button below


