Hey everyone! My name is Amy and I'm the girl behind The Stitchin' Mommy blog and Etsy shop! Even though my little one is not a baby anymore and I'm not currently preggo, I am in love with Chelsea's Baby Series. I know so many women that are currently pregnant, most with their first child, and would find all of these tips, tricks, and ideas super helpful!
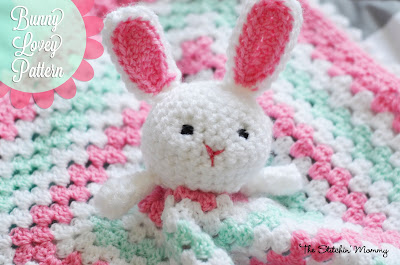
Today I'm going to share an older post of mine but I love it because it's super cute for any baby and would make an adorable gift for a new mom. It's my ever so popular Crochet Bunny Lovey Pattern. The pattern is super easy so it's perfect for a newbie crocheter or even a crocheting expert.
Crochet Bunny Lovey Pattern
Materials:
- Soft Baby yarn in 3 colors (I used Bernat Softee Baby in Prettiest Pink, Mint, and White)
- Crochet Hook Size H
- Stitch Marker
- Tapestry Needle
- Embroidery Floss in Pink and Black
- Fiberfill for bunny head
Abbreviations:
sc - single crochet
dc - double crochet
hdc - half-double crochet
sl st - slip stitch
ch - chain
mc - magic circle
sk - skip
sc dec - single crochet decrease
Instructions:
Blanket:
For the blanket, I used a basic granny square pattern. This pattern from the Purl Bee is a great free pattern and very easy to follow. I used my 3 colors and crocheted 19 rounds (I know it's kind of a random number but it felt right). I finished the blanket off with one round of hdc's in the last color and then a beautiful picot edging in white. I weaved the ends with my tapestry needle.
To make the picot edging:
- Attach yarn to any corner stitch
- Ch 3
- Sc into the third ch from hook
- Sk 2 sc, sc into next st, ch 3, sc into third ch from hook.
- Repeat step 4 around your blanket until you have completed the edging for the entire blanket. Join with a sl st into the beginning st.
- Fasten, weave ends.
Bunny Arms (Make 2):
Magic Circle
Rnd 1: Working in rounds, 4 sc in circle
Rnd 2: [1 sc in next st, 2 sc in next st] twice (6 sts)
Rnd 3: 1 sc in each st around (6 sts)
Rnd 4: [1 sc in next st 1 sc dec in next st] twice (4 sts)
Rnd 5-7: 1 sc in each st around (6)
Fasten off and leave a long tail for sewing. Set arms aside.
Bunny Ears (Make 2):
Outer ear (White):
Ch 9
Sc in 2nd ch from hook and each of the next 7 chs. 5 sc in last ch.
Working down the opposite side of the ch 9, sc in the next 7 chs (19 sts all together)
Working around, [sc in next 7 sts, 2sc in next st] twice. Sc in last 3 sts (21 sts)
Fasten off and leave a long tail for sewing.
Inner ear (Pink):
Ch 8
Sc crochet in 2nd ch from hook and each of the next 6 chs. 5 sc in last ch.
Working down the opposite side of the ch 8, sc in each of the next 6 chs (17sts in total)
Fasten off and leave a long tail for sewing.
Using a tapestry needle, sew the inner part of the ear to the outer part and set aside.
Bunny Head:
Magic Circle
Rnd 1: Working in rounds, 5 sc in magic circle
Rnd 2: 2 sc in each st around (10sts)
Rnd 3: [1 sc in next st, 2 sc in next st] repeat around (15 sts)
Rnd 4: [1 sc in next 2 sts, 2 sc in next st] around (20 sts)
Rnd 5: [1 sc in next 3 sts, 2 sc in next st] around (25 sts)
Rnd 6: [1 sc in next 4 sts, 2 sc in next st] around (30 sts)
Rnds 7-10: sc in each st around (30 sts)
Rnd 11: [1 sc in next 4 sts, sc dec] repeat around (25 sts)
Rnd 12: [1 sc in next 3 sts, sc dec] around (20 sts)
Rnd 13: [1 sc in next 2 sts, sc dec] around (15 sts)
***Start stuffing the head. I like to embroider the eyes and nose before I fasten off the yarn.
Rnd 14: [1 sc in next st, sc dec in next st] around (10 sts)
Rnd 15: Sc dec in each st around (5 sts)
Fasten off. Leave a long tail for sewing.
Attach the ears to the top of your bunny head and attach the arms to the underside of the bunny head. Attach the finished bunny to the center of your granny square blanket and now you have an adorable lovey!
I hope you enjoy the pattern! Thank you to Chelsea for letting me share this adorable lovey with you. To all of the moms-to-be out there, good luck with everything and I hope that you have found Chelsea's tips useful and have enjoyed the wonderful guest posts so far!


No comments
I'd love to hear from you!