
My little dude needs a chair! You know, us grown ups don't share our chairs very well. Plus, he is always stealing our chairs or unhappy in the spot he picked. I knew I needed to fix this. I got online and saw these ADORABLE Pottery Barn chairs. SO CUTE!!! But for the price....um not going to happen. Instead, I said to myself....you can so make one of those. That is how the DIY Anywhere Chair was born.

This post contains affiliate links to products I recommend. I do make a portion off any you may purchase. See full disclosure here.
Chair patterns aren't easy to come by so I made my own pattern and now I am excited to share it with you. No, I don't expect the entire world to be super excited to make their own chair, but for me, it was really fun, challenging and turned out really cute.

UPDATE: We have had this chair for 8 years now and it is still in great shape. Just in case you are wondering.
Today, I want to share with you a step by step tutorial on how to make your own DIY Anywhere Chair.

P.S. Isn't my little man just adorable? I can't believe how little he is in this picture.
DIY Anywhere Chair
Supplies
Needed:
Foam
3”x 24”x 72”
Muslin ½ yard
Batting 2 bags
2 ½ yards
of fabric
2 22” zippers
Matching
Thread
Glue (if
you want)
You might
want to start by measuring out all of your pieces. I’ll list the dimensions I used below. I left room for a 5/8” seam allowance.

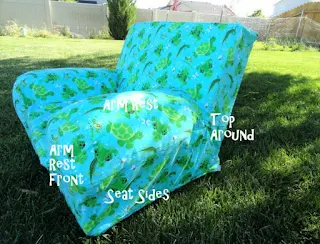
Fabric Cutting Chart
Back
21” x 19”—cut 1
Top (Around) 44” x 5”—cut 1
Top Front 22” x 14” —cut 1
Seat 13 ½” x 15 ½ "—cut 1
Seat Sides 22 ½” x 8” —cut 2
Arm Rest 14” x 14 1/2” —cut 2
Arm Rest Front 14” x 8” —cut 2
Seat Front 13” x 8” —cut 1
Bottom 20” x 20” —cut 1
Muslin
28” x
21”—cut 2


Foam Cutting Chart
Base 20” x 20” x 6”
Back 20” x 14” x 6”
I needed
several layers of foam to make my 6” for my seat.
Just stack your layers however works best for you. You might consider gluing them as well.

Step 1
Cut out all your fabric pieces and your foam. I used a marker to mark my foam and an exacto
knife to cut it.

Step 2
Cut out 2 of your 28” x 21” muslin pieces. These will be your arm rests. Fold them in half with your 21” sides together. Sew down the front leaving an opening in the
middle.
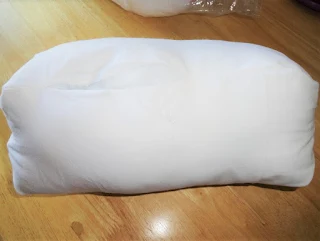

Step 3
Sew the ends of your arm rests closed. Turn right side out through your opening. Stuff very full with batting. Stitch opening closed using slipstitch.

It should look something like this once your foam is all cut and your arm rests are done.

Step 4
Take the back piece and the top round piece. Find the middle of each piece and pin them
with right sides together. Stitch the raw edges together.

Step 5
Take seat sides and pin them to the back just below your top
round. Make sure you pin up the side and
then pin the seat side to the bottom edge of your top round piece.


Do this to both sides of your seat and then sew them right
sides together. Set this piece aside for now.

Step 6
Pick up your seat piece and your arm rest
pieces. Pin them together on the sides and sew.


Step 7
To make your arm rest front, you need to pin the rounded edges of the arm rest front to the arm
rest. Notice the arrows on that hopefully will help you to
understand a little better. Sew.

You’ll need to create a pattern from your arm rests. It should look a bit like the one above. Make sure it is long enough and
cut it out.

Step 9
Take the seat front.
Pin it to the arm rest fronts and the seat. Sew together.

Step 10
Pick up your Top Front piece. Lay your top front piece flat on a table with the right side
facing up. Take your sewn up “seat” piece flip it upside down so that
the wrong side is facing out and the back part of the seat is on the bottom of
the Top Front.

Step 11
Pin the bottom edge of the Top Front to the back edge of the
seat back in the middle.
Now a tricky part.
Take your pattern for the arm rest front and trace it onto your Top
Front. Do this on both sides. (This is where you will sew your arm rest to
the back of the chair.)
Pin your arm rest piece around where you traced the
pattern.
Now sew from the middle out around your arm rest pieces.
You’ve survived so far making your DIY Anywhere Chair!!!
Now match your Top Front and your back pieces with right sides together.
Pin the Top Front and the Back pieces all the way
around. Make sure the pin the Seat Sides
and the Arm Rest together correctly. Sew
from the top middle out.
Step 13
Before you sew the bottom on, slip your cover onto your foam
and make sure everything seems to fit alright.
Now sew your Bottom piece on. Sew the front and one side down. (right sides together)

Step 14
Now insert your zipper for the other side and the back. Make sure the top of the zippers are facing
one another.
Slip your cover on and you are done!!

There you have it. I didn't say it would be easy, only that it would be worth it. We really love our DIY Anywhere Chair and I hope you will enjoy yours as well.


