
 Everyone needs a place to put baby diapers. Seriously, they invade otherwise. I looked online for diaper organizers and stackers. They sure are expensive. So I figured, I could make my own. I used this same fabric for the nursery curtains. Since I had a lot leftover, I figured I would use the same fabric and make a diaper stacker.
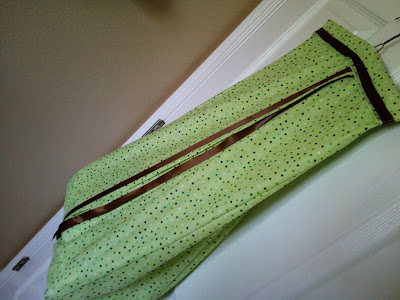
 The nice thing is I put my own hanger on it and I can hang it on the back of the door so it is out of the way.
 It can hold about 30-40 diapers comfortably. It is so nice.
**********Update**********
A few people have asked about directions, so I've posted them here if you'd like to try it out. If they don't make any sense or you get lost, just email me at getyourcraptogether@gmail.com
n measuring my diaper organizer finished, it is 12" wide, 25" long, and 8" deep. I would say you'll need about 2 1/2 yards of fabric. That might be a little much, but it is always good to have extra. (And you can make matching curtains if you have too much!)
Cut 1 - 13" x 26" piece of fabric (back)
Cut 2 - 7" x 26" pieces of fabric (front)
Cut 1 - 8" x 13" piece of fabric (bottom)
Cut 2 - 8" x 26" pieces of fabric (sides)
Cut 1 - 13" x 5" piece of fabric (this is what I used at the top to cover my hanger)
1 spool of ribbon
Sew your side pieces to your back piece at 5/8" and finish the edges with a zig zag. Finish the inside edges on your front pieces by folding them over 1/4" and then 1/4" again and sewing (these will be where your opening is). Sew on your ribbon. Sew your front pieces to your side pieces and finish the edges. Sew your bottom onto your front/back piece. At the top, fold your sides in so that they make a dart. (This will allow you to have space at the top but you won't have a square diaper holder.)
Take your 13" x 5" piece and fold both long edges down 1/4" and along the short edges and iron. Then iron the whole piece in half with right sides out. I ironed a thick piece of interfacing in the middle of my piece and then cut a button hole for the top of my hanger to come through. This helps to keep the fabric from ripping. Place your hanger inside your piece. Pin it in so it can't move. Then pin your 13" x 5" piece to the top of your organizer and sew it down. Finally sew your two short sides so they are closed and your hanger won't come out.
You should be done now. Hopefully, that all makes sense.


Love it! How come I've never seen one of these before? My diapers are still in the box on the floor. Classy, lol.
ReplyDeleteI love the fabric you used! Thanks for linking @Creative Itch's "Sew Cute Tuesday"!
ReplyDeleteWhy is the front parts only 13" long? I have all my pieces cut but it doesn't look right!
ReplyDeleteAlways hand wash and dry covers. They will last much, much longer. When unsure simply consult your diaper company's website for care advice.Vaikiska patalyne
ReplyDelete